Search K
Appearance
基于 Java NIO 封装的网络框架
关于 IO 模型的演变以及多路复用可以看看这篇文章,很详细。
关键词
DMA:直接内存访问 Direct Memory Access
阻塞:循环等待;
阻塞读:让出 CPU,直到有足够的数据可读取才会被唤醒进行数据读取
阻塞写:如果缓存空间不足以写入所有的数据则阻塞等待,直到缓存空间足够大到可以一次性写入所有数据
非阻塞;不循环等待,若无数据直接返回
IO 的同步模式:由用户线程的内核态来将数据从内核空间拷贝到用户空间(Linux下的
epoll和Mac 下的kqueue都属于同步 IO)IO 的异步模式:由内核来将数据从内核空间拷贝到用户空间,并通知用户线程数据拷贝的结果。
…从上面可以看到,异步 IO 比较依赖于底层内核的支持
C10K 问题:C10K 表示处理 10000 个并发连接。
注意这里的并发连接和每秒请求数不同,虽然它们是相似的:每秒处理许多请求需要很高的吞吐量(快速处理它们),但是更大的数量并发连接需要高效的连接调度。
…
public class EchoServer {
  private final int port;
  public EchoServer(int port) {
      this.port = port;
  }
  public void start() {
    	// NioEventLoopGroup 用来处理 I/O 操作的多线程事件循环器
    	// boss 接收到信息后注册到 worker 上,由 worker 来处理数据
      NioEventLoopGroup boss = new NioEventLoopGroup(); // 接收连接
      NioEventLoopGroup worker = new NioEventLoopGroup(); // 处理连接
      try {
        	// 启动 NIO 服务的辅助启动类
          ServerBootstrap server = new ServerBootstrap();
        	// Set the EventLoopGroup for the parent (acceptor) and the child (client)
          server.group(boss, worker)
            			// The Class which is used to create Channel instances
                  .channel(NioServerSocketChannel.class)
                  .childHandler(new ChannelInitializer<SocketChannel>() {
                      @Override
                      protected void initChannel(SocketChannel ch) throws Exception {
                          ch.pipeline().addLast(new EchoServerChannelHandler());
                      }
                  })
            			// Allow to specify a ChannelOption which is used for the Channel instances once they got created
                  .option(ChannelOption.SO_BACKLOG, 128)
            			// Allow to specify a ChannelOption which is used for the Channel instances once they get created (after the acceptor accepted the Channel)
                  .childOption(ChannelOption.SO_KEEPALIVE, true);
          // start
          ChannelFuture future = server.bind(port).sync();
          System.out.println("server started, listen on port " + port);
          future.channel().closeFuture().sync(); // 阻塞直到 future 关闭
      } catch (Exception e) {
          throw new RuntimeException(e);
      } finally {
          boss.shutdownGracefully();
          worker.shutdownGracefully();
      }
  }
  public static void main(String[] args) {
      new EchoServer(8080).start();
  }
}public class EchoServerChannelHandler extends ChannelInboundHandlerAdapter {
// channelRead 方法会在收到客户端新消息时被调用
@Override
public void channelRead(ChannelHandlerContext ctx, Object msg) throws Exception {
ByteBuf byteBuf = (ByteBuf) msg;
try {
System.out.println("[server] received " + byteBuf.toString(CharsetUtil.UTF_8));
// response
ctx.write("server echo");
// ctx.flush();
} finally {
ReferenceCountUtil.release(msg);
}
}
@Override
public void channelReadComplete(ChannelHandlerContext ctx) throws Exception {
super.channelReadComplete(ctx);
ctx.writeAndFlush(Unpooled.EMPTY_BUFFER) // flush 缓存中的所有数据到到远程
.addListener(ChannelFutureListener.CLOSE);
}
@Override
public void exceptionCaught(ChannelHandlerContext ctx, Throwable cause) throws Exception {
cause.printStackTrace();
ctx.close(); // Close
}
}public class EchoClient {
private final String host;
private final int port;
public EchoClient(String host, int port) {
this.host = host;
this.port = port;
}
public void start() {
NioEventLoopGroup workerGroup = new NioEventLoopGroup();
try {
Bootstrap b = new Bootstrap();
b.group(workerGroup)
.channel(NioSocketChannel.class)
.remoteAddress(new InetSocketAddress(host, port))
.handler(new ChannelInitializer<SocketChannel>() {
@Override
protected void initChannel(SocketChannel ch) throws Exception {
ch.pipeline().addLast(new EchoClientChannelHandler());
}
});
ChannelFuture future = b.connect().sync();
System.out.println("echo client started");
future.channel().closeFuture().sync(); // 阻塞直到 future 关闭
} catch (InterruptedException e) {
throw new RuntimeException(e);
} finally {
workerGroup.shutdownGracefully();
}
}
public static void main(String[] args) {
new EchoClient("localhost", 8080).start();
}
}// @ChannelHandler.Sharable 表示这个类的实例可以在 pipeline 中多次共享
@ChannelHandler.Sharable
public class EchoClientChannelHandler extends SimpleChannelInboundHandler<ByteBuf> {
@Override
public void channelActive(ChannelHandlerContext ctx) throws Exception {
ctx.writeAndFlush(Unpooled.copiedBuffer("hello! This is client", CharsetUtil.UTF_8));
}
@Override
protected void channelRead0(ChannelHandlerContext ctx, ByteBuf msg) throws Exception {
System.out.println("[client] received " + msg.toString(CharsetUtil.UTF_8));
}
@Override
public void exceptionCaught(ChannelHandlerContext ctx, Throwable cause) throws Exception {
cause.printStackTrace();
ctx.close();
}
}可以看到,相比于单纯使用 Java NIO,使用 Netty 来创建网络客服务器和客户端就少了很多代码。Java NIO 中 Selector、Channel、Buffer 三个部分都需要自行关注其逻辑实现;在 Netty 中更多的是关注如何处理数据,减少了很多代码和繁琐的创建逻辑,只需要关注业务逻辑。
与 Java NIO 中的 ByteBuffer 一样,用作容器。Netty 使用引用计数来判断一个 ByteBuf 何时被释放。
如何创建
推荐通过 Unpooled 类来创建 ByteBuf 实例。
访问索引
ByteBuf 使用一个读和一个写索引作为数据访问指针。
+-------------------+------------------+------------------+
| discardable bytes | readable bytes   | writable bytes   |
|                   | (CONTENT)        |                  |
+-------------------+------------------+------------------+
|                   |                  |                  |
0     <=      readerIndex    <=   writerIndex    <=    capacity
数据读取
任何名称以 read 或 skip 开头的操作都会获取或跳过 readerIndex 之前的数据
数据写入
任何名称以 write 开头的操作都会在当前 writerIndex 处写入数据,如果没有足够的可写字节,报错 IndexOutOfBoundsException。
数据丢弃
任何在 readerIndex 之前的数据在调用 discardReadBytes() 方法之后都会被丢弃
 *  BEFORE discardReadBytes()
 *
 *      +-------------------+------------------+------------------+
 *      | discardable bytes |  readable bytes  |  writable bytes  |
 *      +-------------------+------------------+------------------+
 *      |                   |                  |                  |
 *      0      <=      readerIndex   <=   writerIndex    <=    capacity
 *
 *  AFTER discardReadBytes()
 *
 *      +------------------+--------------------------------------+
 *      |  readable bytes  |    writable bytes (got more space)   |
 *      +------------------+--------------------------------------+
 *      |                  |                                      |
 * readerIndex (0) <= writerIndex (decreased)        <=        capacity
数据清空操作
可以通过调用 clear() 方法来清空当前 ByteBuf
 *  BEFORE clear()
 *
 *      +-------------------+------------------+------------------+
 *      | discardable bytes |  readable bytes  |  writable bytes  |
 *      +-------------------+------------------+------------------+
 *      |                   |                  |                  |
 *      0      <=      readerIndex   <=   writerIndex    <=    capacity
 *
 *  AFTER clear()
 *
 *      +---------------------------------------------------------+
 *      |             writable bytes (got more space)             |
 *      +---------------------------------------------------------+
 *      |                                                         |
 *      0 = readerIndex = writerIndex            <=            capacity
复合类型
假设存在以下内容,在 NIO 中要创建一个新的大缓存区用来拷贝这两部分到这个新缓存区中。
 +--------+----------+
 | header |   body   |
 +--------+----------+
在 Netty 中可以将这两个类型都包装成 ByteBuf
// 复合类型与组件类型是兼容的。
ByteBuf message = Unpooled.wrappedBuffer(header, body);

// 因此,你甚至可以通过混合复合类型与普通缓冲区来创建一个复合类型。
ByteBuf messageWithFooter = Unpooled.wrappedBuffer(message, footer);

// 由于复合类型仍是 ByteBuf,访问其内容很容易,
//并且访问方法的行为就像是访问一个单独的缓冲区,
//即使你想访问的区域是跨多个组件。
//这里的无符号整数读取位于 body 和 footer
messageWithFooter.getUnsignedInt(
     messageWithFooter.readableBytes() - footer.readableBytes() - 1);
自动扩容
// 一种新的动态缓冲区被创建。在内部,实际缓冲区是被“懒”创建,从而避免潜在的浪费内存空间。
ByteBuf b = Unpooled.buffer(4);

// 当第一个执行写尝试,内部指定初始容量 4 的缓冲区被创建
b.writeByte('1');

b.writeByte('2');
b.writeByte('3');
b.writeByte('4');

// 当写入的字节数超过初始容量 4 时,
//内部缓冲区自动分配具有较大的容量
b.writeByte('5');顾名思义,将缓冲数据保存在 JVM 的堆区中
Java NIO 新增的缓冲类,可以将缓冲数据保存到 JVM 堆外存中,不会被垃圾回收。
A packet which is send or receive.
Buffer 引用计数器,ByteBuf 和 ByteBufHolder 均继承自 ReferenceCounted。活动的引用计数器大于 0 的对象被保证不被释放。当数量引用减少到 0,该实例将被释放
| ServerBootstrap | Bootstrap | |
|---|---|---|
| 网络功能 | 绑定本地端口 | 连接到远程主机和端口 |
| EventLoopGroup 数量 | 2 | 1 |
负责启动 Netty 服务端,使用 bind() 方法绑定指定端口后启动服务。
负责启动 Netty 客户端,提供了一个用于应用程序网络层配置的容器。使用 connect() 方法进行 TCP 传输,bind() 方法进行 UDP 传输。
connect 和 bind 方法返回一个 ChannelFuture 表示异步 Channel I/O 操作的结果。
连接到网络套接字(Socket)或能够执行 I/O 操作(例如读取、写入、连接和绑定)的组件。可以对 Channel 进行以下操作:
1、查看当前 Channel 的状态
2、查看 Channel 的配置
3、查看 Channel 支持的操作(读/写/连接/端口绑定)
4、获取和当前 Channel 相关的 ChannelPipeline
Channel 是可继承的,一个 Channel 可以有一个 parent(取决于 Channel 是如何创建的)。比如在客户端 Channel 中可能会收到来自服务端的 SocketChannel,客户端会使用 ServerSocketChannel 来接收数据并创建出该 SocketChannel,此时调用 SocketChannel#parent 得到的就是客户端的 ServerSocketChannel。
表示异步 Channel 的操作结果,Netty 中所有 IO 操作都是异步的,任何 I/O 调用都会立即返回。但 Netty 不保证所请求的 I/O 操作在调用结束时已经完成,ChannelFuture 实例提供了关于 I/O 操作的结果或状态的信息。
ChannelFuture 是一个 Future 类型的操作结果,是只读的。
ChannelPromise 是 ChannelFuture 的一个子类,是可写的。
处理一个 I/O 事件或拦截一个 I/O 操作,并将其转发给 ChannelPipeline 中的下一个 Handler。
ChannelHandler 本身没有提供很多方法,它提供以下子接口:
此外还提供了一系列 Adapter,可以更方便的实现操作:
业务逻辑处理基本上都是在各个 ChannelHandler 中进行的。
@Sharable
如果 ChannelHandler 使用了 @Sharable 注解,这意味该 ChannelHandler 可以在一个或多个 ChannelPipeline 中共享。如果不指定这个注解,必须每次将其添加到 ChannelPipeline 时创建一个新的 ChannelHandler 实例。
将 ChannelHandler 和 ChannelPipeline 相关联起来的上下文,ChannelHandlerContext 定义 pipeline() 方法可以用来获取与当前 ChannelHandler 相关联的 ChannelPipeline。
因为 ChannelHandler 可以被添加到多个 ChannelPipeline 中,所以一个共享的 ChannelHandler 实例(标注 @Sharable)可能有多个 ChannelHandlerContext。
ChannelPipeline 是 ChannelHandler 链的容器。每个 Channel 都有一个对应的 ChannelPipeline,用于管理 ChannelHandler,多个 ChannelHandler 在 ChannelPipeline 上形成一条调用链。
 *                                                 I/O Request
 *                                            				 or
 *                                        		ChannelHandlerContext
 *                                                      |
 *  +---------------------------------------------------+---------------+
 *  |                           ChannelPipeline         |               |
 *  |                                                  \|/              |
 *  |    +---------------------+            +-----------+----------+    |
 *  |    | Inbound Handler  N  |            | Outbound Handler  1  |    |
 *  |    +----------+----------+            +-----------+----------+    |
 *  |              /|\                                  |               |
 *  |               |                                  \|/              |
 *  |    +----------+----------+            +-----------+----------+    |
 *  |    | Inbound Handler N-1 |            | Outbound Handler  2  |    |
 *  |    +----------+----------+            +-----------+----------+    |
 *  |              /|\                                  .               |
 *  |               .                                   .               |
 *  | ChannelHandlerContext.fireIN_EVT() ChannelHandlerContext.OUT_EVT()|
 *  |        [ method call]                       [method call]         |
 *  |               .                                   .               |
 *  |               .                                  \|/              |
 *  |    +----------+----------+            +-----------+----------+    |
 *  |    | Inbound Handler  2  |            | Outbound Handler M-1 |    |
 *  |    +----------+----------+            +-----------+----------+    |
 *  |              /|\                                  |               |
 *  |               |                                  \|/              |
 *  |    +----------+----------+            +-----------+----------+    |
 *  |    | Inbound Handler  1  |            | Outbound Handler  M  |    |
 *  |    +----------+----------+            +-----------+----------+    |
 *  |              /|\                                  |               |
 *  +---------------+-----------------------------------+---------------+
 *                  |                                  \|/
 *  +---------------+-----------------------------------+---------------+
 *  |               |                                   |               |
 *  |       [ Socket.read() ]                    [ Socket.write() ]     |
 *  |                                                                   |
 *  |  Netty Internal I/O Threads (Transport Implementation)            |
 *  +-------------------------------------------------------------------+
Pipeline 上的事件转发
ChannelHandler 通过调用 ChannelHandlerContext 中的方法,将事件传递给调用链上的下一个 ChannelHandler。
创建 Pipeline
一个 Pipeline 上可能会有多和 ChannelHandler,分别负责不同的工作,比如:
在使用 Netty 来实现服务器的过程中你可能会奇怪,NIO 中的 Selector 角色在哪里?在 Netty 中 EventLoop 中就维护着一个 Selector 实例,用来处理 Channel 的 IO 操作。 Netty 启动时,会将多个 Channel 注册到 EventLoop 中,一个 EventLoop 可以处理多个 Channel 事件,一个 EventLoopGroup 可以包含多个 EventLoop。
用于将 Channel 注册到 Selector 中,内部维护一个 SelectorTuple 类,
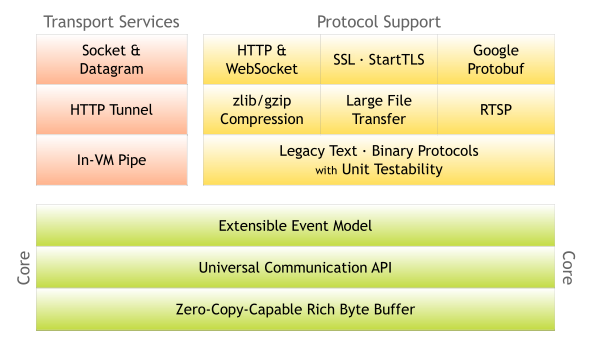
缓冲(Buffer),通道(Channel),事件模型(Event Model)是 Netty 的三大核心。
编码器能帮助我们将 Java 类型转换成 ByteBuf 发送到远程,解码器则将接收到的 ByteBuf 转换成 Java 类型来进行处理。Netty 提供了常见和常用的一些编解码器,能让我们更方便的来操作各种类型的数据:
\n 或 \r\n)作为分隔符来处理数据如在进行聊天系统的开发中,想要直接发送 String 类型,可以在 ChannelPipeline 中添加 StringEncoder 与 StringDecoder 用来帮助处理数据,这样就不用手动将数据在 String 和 ByteBuf 中来回转化。
注意:不论解码器还是编码器,接收的消息类型必须与待处理的消息类型一致,否则该编解码 ChannelHandler 不会被执行。
继承自 ChannelOutboundHandlerAdapter,可以将 Java 类型转换成 ByteBuf 发送出去。
public class IntegerEncoder extends MessageToByteEncoder<Integer> {
  	// This method will be called for each written message that can be handled by this encoder.
    @Override
    public void encode(ChannelHandlerContext ctx, Integer msg, ByteBuf out)
            throws Exception {
        out.writeInt(msg);
    }
}将出站数据从一种消息编码成另一种消息
继承自 ChannelInboundHandlerAdapter,可以将接收到的 ByteBuf 类型转换成 Java 类型。
使用 ByteToMessageDecoder 需要调用 ByteBuf#readableBytes 方法检查接收到的数据是否满足一个 Frame,只有接收到一个 Frame 的数据才能将其完整的转换成 Java 类型。
注意:ByteToMessageDecoder 的子类不能标注 @Sharable。因为可能有多个读写操作在一个 ByteBuf 上同时进行,可能造成内存溢出。可以使用 ByteBuf#readSlice 切分出一个副本再进行操作。
ByteToMessageDecoder 的子类,使用起来更加方便,不需要手动的调用 ByteBuf#readableBytes 检查缓冲中的数据是否满足一个 Frame。
The biggest difference between ReplayingDecoder and ByteToMessageDecoder is that ReplayingDecoder allows you to implement the decode() and decodeLast() methods just like all required bytes were received already
ReplayingDecoder#decode 的触发条件是接收到的数据已经满足一个 Frame,不用再关心过程,直接处理接收到的数据即可。
// 自定义 MessageProtocol 类
public class MessageProtocol {
    private int len;
    private byte[] content;
    public int getLen() {
        return len;
    }
    public void setLen(int len) {
        this.len = len;
    }
    public byte[] getContent() {
        return content;
    }
    public void setContent(byte[] content) {
        this.content = content;
    }
    public MessageProtocol() {}
    public MessageProtocol(int len, byte[] content) {
        this.len = len;
        this.content = content;
    }
}// ByteBuf 解码成 MessageProtocol
public class MessageProtocolDecoder extends ReplayingDecoder<MessageProtocol> {
@Override
protected void decode(ChannelHandlerContext ctx, ByteBuf in, List<Object> out) throws Exception {
// ByteBuf to MessageProtocol
System.out.println("decode MessageProtocol");
int len = in.readInt();
byte[] buf = new byte[len];
in.readBytes(buf); // 将 len 长度的数据读入 buf
// 封装成 MessageProtocol 传递给下一个 handler 处理
MessageProtocol messageProtocol = new MessageProtocol();
messageProtocol.setLen(len);
messageProtocol.setContent(buf);
out.add(messageProtocol);
}
}将入站数据从一种消息解码为另外一种消息
编解码器,可以认为是编码器和解码器的复合体
MessageToMessageEncoder 和 MessageToMessageDecoder 的复合体
结合解码器和编码器在一起可能会牺牲可重用性,为了避免这种情况,出现了 CombinedChannelDuplexHandler。
public class CombinedByteCharCodec extends CombinedChannelDuplexHandler<ByteToCharDecoder, CharToByteEncoder> {
    public CombinedByteCharCodec() {
        super(new ByteToCharDecoder(), new CharToByteEncoder());
    }
}下面是一段 Netty 服务端实例化并启动的流程
NioEventLoopGroup boss = new NioEventLoopGroup();
NioEventLoopGroup worker = new NioEventLoopGroup();
try {
    ServerBootstrap server = new ServerBootstrap()
            .group(boss, worker)
            .channel(NioServerSocketChannel.class)
            .childHandler(new ChannelInitializer<SocketChannel>() {
                @Override
                protected void initChannel(SocketChannel ch) throws Exception {
                    ch.pipeline().addLast(new EchoServerChannelHandler());
                }
            })
            .option(ChannelOption.SO_BACKLOG, 128)
            .childOption(ChannelOption.SO_KEEPALIVE, true);

    // start
    ChannelFuture future = server.bind(port).sync();
    System.out.println("server started, listen on port " + port);

    // 对关闭 Channel 进行监听
    future.channel().closeFuture().sync(); // 阻塞直到 future 关闭
} catch (Exception e) {
    throw new RuntimeException(e);
} finally {
    boss.shutdownGracefully();
    worker.shutdownGracefully();
}先来回顾 Java NIO
// open channel
ServerSocketChannel socketChannel = ServerSocketChannel.open();
// set non-block
socketChannel.configureBlocking(false);
// open Selector
Selector selector = Selector.open();
// register channel
SelectionKey selectionKey = socketChannel.register(selector, 0, socketChannel);
// 设置感兴趣的事件
selectionKey.interestOps(SelectionKey.OP_ACCEPT);
socketChannel.bind(new InetSocketAddress(8888));
需要手动打开 Channel,打开 Selector,再将 Channel 注册到 Selector 上。
先说结论:Bootstrap 就是帮助我们打开 Channel,并绑定端口的启动类或者说辅助类。
Bootstrap sub-class which allows easy bootstrap of ServerChannel
翻译过来就是:ServerBootstrap 是 Bootstrap 的子类,开启一个 ServerChannel。
ServerBootstrap 有一个父类 AbstractBootstrap
AbstractBootstrap is a helper class that makes it easy to bootstrap a Channel
AbstractBootstrap 是一个辅助类,用来开启一个 Channel。并提供一个 bind 方法用来绑定指定的端口进行 TCP/UDP 传输。
ServerBootstrap 如何帮助我们打开 Channel?
回顾一下上面的代码
ServerBootstrap server =
  new ServerBootstrap()
    .group(boss, worker) // [1]
    .channel(NioServerSocketChannel.class) // [2]
    .childHandler(new ChannelInitializer<SocketChannel>() { // [3]
        @Override
        protected void initChannel(SocketChannel ch) throws Exception {
            ch.pipeline().addLast(new EchoServerChannelHandler());
        }
    })
    .option(ChannelOption.SO_BACKLOG, 128)
    .childOption(ChannelOption.SO_KEEPALIVE, true);

// start
ChannelFuture future = server.bind(port).sync();
在第 [2] 行代码中,AbstractBootstrap#channel 方法需要我们传入一个 Channel 工厂类,再利用 Java 的反射来创建 Channel。
// channelClass: The Class which is used to create Channel instances from
public B channel(Class<? extends C> channelClass) {
    return channelFactory(new ReflectiveChannelFactory<C>(
            ObjectUtil.checkNotNull(channelClass, "channelClass")
    ));
}public ReflectiveChannelFactory(Class<? extends T> clazz) {
// ...
this.constructor = clazz.getConstructor();
// ...
}在上面的代码中可以看到,ReflectiveChannelFactory 利用反射调用 NioServerSocketChannel 的无参构造器来创建 NioServerSocketChannel 实例。到这里我们服务端需要的 Channel 就创建完毕了。
回顾 Java NIO,在开启了一个 Channel 之后,我们需要手动的把它注册到 Selector 中,在 Netty 中这一个步骤如何进行?创建了 Channel 之后,该如何注册到 Selector 中?
让我们把目光转移到标号 [1] 这一行代码,接下来就到 NioEventLoopGroup 出场了。
// Debug 的时候注意一下这两个 NioEventLoopGroup,
// 后面可以用来和 AbstractBootstrap#initAndRegister 中的 config().group() 进行比较
NioEventLoopGroup boss = new NioEventLoopGroup();
NioEventLoopGroup worker = new NioEventLoopGroup();
上面两句代码中,分别创建了 boss 组和 worker 组,为什么要创建两个组呢?这是后话。我们使用 NioEventLoopGroup 的无参构造器来创建实例。
// Create a new instance using the default number of threads, the default ThreadFactory and the SelectorProvider which is returned by SelectorProvider.provider().
public NioEventLoopGroup() { this(0); }
如果使用无参构造器,创建的 EventLoopGroup 使用的线程默认为 CUP 核心数 * 2
DEFAULT_EVENT_LOOP_THREADS = Math.max(1, SystemPropertyUtil.getInt
("io.netty.eventLoopThreads", NettyRuntime.availableProcessors() * 2));
还记得 Java NIO 中的内容吗?
Selector#open 方法会使用系统默认的 SelectorProvider 创建一个 Selector;也可以使用自定义的 SelectorProvider 来创建 Selector。
在 Netty 中,也是使用 SelectorProvider 来创建 Selector
public NioEventLoopGroup(int nThreads, Executor executor) {
    this(nThreads, executor, SelectorProvider.provider());
}// SelectorProvider#provider -> provider = sun.nio.ch.DefaultSelectorProvider.create();
public static SelectorProvider create() {
String osname = AccessController
.doPrivileged(new GetPropertyAction("os.name"));
if (osname.equals("SunOS"))
return createProvider("sun.nio.ch.DevPollSelectorProvider");
if (osname.equals("Linux"))
return createProvider("sun.nio.ch.EPollSelectorProvider");
return new sun.nio.ch.PollSelectorProvider();
}可以看到,Netty 会根据 OS 使用不同的 SelectorProvider 来创建 Selector。
**Selector 在哪里呢?**顺着下面的流程:
1、NioEventLoopGroup()
2、MultithreadEventLoopGroup(int, Executor, Object...)
3、MultithreadEventExecutorGroup(int, Executor, EventExecutorChooserFactory, Object...)
4、NioEventLoopGroup#newChild
5、NioEventLoop(NioEventLoopGroup, Executor, SelectorProvider, SelectStrategy, RejectedExecutionHandler, EventLoopTaskQueueFactory, EventLoopTaskQueueFactory)
NioEventLoop(/**...**/) {
    super(parent, executor, false, newTaskQueue(taskQueueFactory), newTaskQueue(tailTaskQueueFactory),
            rejectedExecutionHandler);
    this.provider = ObjectUtil.checkNotNull(selectorProvider, "selectorProvider"); // 设置 SelectorProvider
    this.selectStrategy = ObjectUtil.checkNotNull(strategy, "selectStrategy"); // IO 就绪事件轮询的策略
  	// SelectorTuple 包含:unwrappedSelector 和 selector
    final SelectorTuple selectorTuple = openSelector();
    this.selector = selectorTuple.selector;
    this.unwrappedSelector = selectorTuple.unwrappedSelector;
}
现在恍然大悟,原来一直没出现的 Selector 角色被 Netty ”藏“在了 EventLoop 中。由此我们也可以确定,Channel 是注册到 EventLoop 所管理的 Selector 中的。
到这里,Channel 开启了,Selector 有了,那何时注册 Channel?
还记得 AbstractBootstrap 吗?它是 ServerBootstrap 的父类,初始化并注册 Channel 的操作就是在 AbstractBootstrap#doBind 方法中进行的。
private ChannelFuture doBind(final SocketAddress localAddress) {
  	// initAndRegister 初始化 Channel 并注册到 Selector 中
    final ChannelFuture regFuture = initAndRegister();
    final Channel channel = regFuture.channel();
  	// ...
}final ChannelFuture initAndRegister() {
Channel channel = null;
// 反射拿到 Channel,同时创建 ChannelPipeline
channel = channelFactory.newChannel();
// 初始化 Channel,设置 ChannelOption、设置 ChannelPipeline
init(channel); // 这里有个细节,后续再聊
// 将 Channel 注册到 EventGroup 中
ChannelFuture regFuture = config().group().register(channel);
}从 AbstractBootstrap#initAndRegister 代码中可以看出,它主要负责创建和初始化 Channel。这里的 init(channel) 这句代码在后续会聊到。看到最后 group().register(channel) 这一句代码:将 Channel 注册到 EventLoopGroup 中。
顺着代码调用流程来观察一下,看一下 Channel 注册的细节:
1、AbstractBootstrap#doBind
2、AbstractBootstrap#initAndRegister 第一次执行 group() 方法拿到的是 AbstractBootstrap#group,即我们之前创建的 boss
3、MultithreadEventLoopGroup#register
4、SingleThreadEventLoop#register(Channel)
5、SingleThreadEventLoop#register(Channel, EventExecutor),将 Channel 包装成 ChannelPromise,传入的 EventExecutor 参数是 SingleThreadEventLoop
6、SingleThreadEventLoop#register(ChannelPromise)
7、AbstractChannel.AbstractUnsafe#register 检查当前线程在不在当前 EventLoop 中
8、AbstractChannel.AbstractUnsafe#register0
9、AbstractNioChannel#doRegister
protected void doRegister() throws Exception {
    boolean selected = false;
    for (;;) {
      	// javaChannel() 表示之前创建的 NioServerSocketChannel,具体看 NioServerSocketChannel#NioServerSocketChannel(ServerSocketChannel)
      	// eventLoop() 返回 AbstractBootstrap#group,即 bossGroup
      	// 将 Channel 注册到 bossGroup 中
        selectionKey = javaChannel().register(eventLoop().unwrappedSelector(), 0, this);
      	// ...
    }
}
10、AbstractSelectableChannel#register
// ops 表示感兴趣的事件
// att 表示即将注册到当前 Selector 的 Channel
public final SelectionKey register(Selector sel, int ops,
                                   Object att)
    throws ClosedChannelException
{
    synchronized (regLock) {
        // 异常判断...
        if (!isOpen())
            throw new ClosedChannelException();
        if ((ops & ~validOps()) != 0)
            throw new IllegalArgumentException();
        if (isBlocking())
            throw new IllegalBlockingModeException();

        SelectionKey k = findKey(sel);
        if (k != null) {
            k.interestOps(ops);
            k.attach(att);
        }
        if (k == null) {
            // New registration
            synchronized (keyLock) {
                if (!isOpen())
                    throw new ClosedChannelException();
                k = ((AbstractSelector)sel).register(this, ops, att);
                addKey(k); // SelectionKey 集合
            }
        }
        return k;
    }
}
在上面的代码中,SelectionKey 出现了。回想一下 Java NIO,将 SelectableChannel 注册到 Selector 后由 SelectionKey 集合来表示。
到这里就表示服务端自身的 Channel 注册完成了,是注册到 bossGroup 关联的 EventLoop 中的 Selector 的。
好,现在可以回到我们上面的问题:为什么要创建 boss 和 worker 两个组呢?它们是如何工作的?
先给出结论:
但是,走完上面的流程,我们只观察到了 Channel 注册到 bossGroup 中,workerGroup 何时发挥作用?
在讲到 AbstractBootstrap#initAndRegister 这个方法时,有一句代码 init(channel); 在这里发挥了重要作用。看到 ServerBootstrap#init
void init(Channel channel) {
  	// 设置 ChannelOption
    setChannelOptions(channel, newOptionsArray(), logger);
  	// 设置 Channel 属性
    setAttributes(channel, newAttributesArray());
		// 获取 ChannelPipeline
  	// 在创建 Channel 的时候也会同步创建 ChannelPipeline
    ChannelPipeline p = channel.pipeline();
		// 主角 workerGroup 来了
    final EventLoopGroup currentChildGroup = childGroup;
    final ChannelHandler currentChildHandler = childHandler;
    final Entry<ChannelOption<?>, Object>[] currentChildOptions = newOptionsArray(childOptions);
    final Entry<AttributeKey<?>, Object>[] currentChildAttrs = newAttributesArray(childAttrs);
    p.addLast(new ChannelInitializer<Channel>() {
        @Override
        public void initChannel(final Channel ch) {
            final ChannelPipeline pipeline = ch.pipeline();
            ChannelHandler handler = config.handler();
            if (handler != null) {
                pipeline.addLast(handler);
            }

            ch.eventLoop().execute(new Runnable() {
                @Override
                public void run() {
                  	// ServerBootstrapAcceptor 是关键
                    pipeline.addLast(new ServerBootstrapAcceptor(
                            ch, currentChildGroup, currentChildHandler, currentChildOptions, currentChildAttrs));
                }
            });
        }
    });
}
ServerBootstrapAcceptor 本质是一个 ChannelInboundHandlerAdapter,我们关心的问题就在 ServerBootstrapAcceptor#channelRead 方法中。
private static class ServerBootstrapAcceptor extends ChannelInboundHandlerAdapter {

    private final EventLoopGroup childGroup;
    private final ChannelHandler childHandler;
    private final Entry<ChannelOption<?>, Object>[] childOptions;
    private final Entry<AttributeKey<?>, Object>[] childAttrs;
    private final Runnable enableAutoReadTask;

    ServerBootstrapAcceptor(
            final Channel channel, EventLoopGroup childGroup, ChannelHandler childHandler,
            Entry<ChannelOption<?>, Object>[] childOptions, Entry<AttributeKey<?>, Object>[] childAttrs) {
        this.childGroup = childGroup;
        this.childHandler = childHandler;
        this.childOptions = childOptions;
        this.childAttrs = childAttrs;

        // Task which is scheduled to re-enable auto-read.
        // It's important to create this Runnable before we try to submit it as otherwise the URLClassLoader may
        // not be able to load the class because of the file limit it already reached.
        //
        // See https://github.com/netty/netty/issues/1328
        enableAutoReadTask = new Runnable() {
            @Override
            public void run() {
                channel.config().setAutoRead(true);
            }
        };
    }

    @Override
    public void channelRead(ChannelHandlerContext ctx, Object msg) {
        final Channel child = (Channel) msg;

        child.pipeline().addLast(childHandler);

        setChannelOptions(child, childOptions, logger);
        setAttributes(child, childAttrs);

        try {
          	// 将 Channel 添加到 childGroup,也就是 workGroup 中
            childGroup.register(child).addListener(new ChannelFutureListener() {
                @Override
                public void operationComplete(ChannelFuture future) throws Exception {
                    if (!future.isSuccess()) {
                        forceClose(child, future.cause());
                    }
                }
            });
        } catch (Throwable t) {
            forceClose(child, t);
        }
    }
}
接下来看一下 ServerBootstrap#childHandler,也就是上边的标号 [3] 这一行。
// Set the ChannelHandler which is used to serve the request for the Channel's.
// 设置一个 ChannelHandler,即设置服务器中用来处理请求的 Channel
public ServerBootstrap childHandler(ChannelHandler childHandler) {
    this.childHandler = ObjectUtil.checkNotNull(childHandler, "childHandler");
    return this;
}
在设置 ChannelHandler 的时候,我们传入了一个匿名内部类 ChannelInitializer,它是 ChannelInboundHandler 的子类,使用它能让我们更方便的来处理注册到 EventLoop 中的 Channel。
从这里我们可以知道 ChannelInitializer 是客户端 Channel 注册到 EventLoop 过程中的一个关键类,注意看 ChannelInitializer#initChannel
private boolean initChannel(ChannelHandlerContext ctx) throws Exception {
    if (initMap.add(ctx)) { // Guard against re-entrance.
        try {
          	// 初始化 Channel,执行的是 .childHandler() 方法中的 initChannel()
            initChannel((C) ctx.channel());
        } catch (Throwable cause) {
            // ...
        } finally {
            if (!ctx.isRemoved()) {
                ctx.pipeline().remove(this);
            }
        }
        return true;
    }
    return false;
}
客户端的启动流程跟服务端类似,就不再重复了。
创建了客户端之后添加好对应的编解码器:
protected void initChannel(SocketChannel ch) throws Exception {
    ch.pipeline()
            .addLast(new RedisDecoder())
            .addLast(new RedisEncoder())
            .addLast(new RedisBulkStringAggregator())
            .addLast(new RedisArrayAggregator())
            .addLast(new GreenisChannelHandler());
}
其中,Redis 消息相关的编解码器 Netty 内部已经有实现了,接下来只要自定义处理好消息发送与接收即可:
public class GreenisChannelHandler extends ChannelDuplexHandler {
    // 发送 redis 命令
    @Override
    public void write(ChannelHandlerContext ctx, Object msg, ChannelPromise promise) throws Exception {
        String[] cmds = ((String) msg).split("\\s+");
        ArrayList<RedisMessage> messages = new ArrayList<>(cmds.length);
        for (String cmd : cmds) {
            FullBulkStringRedisMessage redisMessage =
                    new FullBulkStringRedisMessage(ByteBufUtil.writeUtf8(ctx.alloc(), cmd));
            messages.add(redisMessage);
        }
        ArrayRedisMessage requestMessages = new ArrayRedisMessage(messages);
        ctx.write(requestMessages, promise);
    }

  	// 接收 redis 响应
    @Override
    public void channelRead(ChannelHandlerContext ctx, Object msg) throws Exception {
        RedisMessage message = (RedisMessage) msg;
        printResponse(message);
        System.out.print(">");
        ReferenceCountUtil.release(message);
    }

    private void printResponse(RedisMessage message) {
        if (message instanceof SimpleStringRedisMessage) {
            String content = ((SimpleStringRedisMessage) message).content();
            System.out.println(content);
        } else if (message instanceof IntegerRedisMessage) {
            long value = ((IntegerRedisMessage) message).value();
            System.out.println(value);
        } else if (message instanceof FullBulkStringRedisMessage) {
            ByteBuf content = ((FullBulkStringRedisMessage) message).content();
            System.out.println(content.toString(CharsetUtil.UTF_8));
        } else if (message instanceof ArrayRedisMessage) {
            List<RedisMessage> children = ((ArrayRedisMessage) message).children();
            for (RedisMessage child : children) {
                printResponse(child);
            }
        } else if (message instanceof ErrorRedisMessage) {
            String content = ((ErrorRedisMessage) message).content();
            System.out.println(content);
        } else {
            throw new RuntimeException("Unknown message type " + message);
        }
    }
}原理如下图
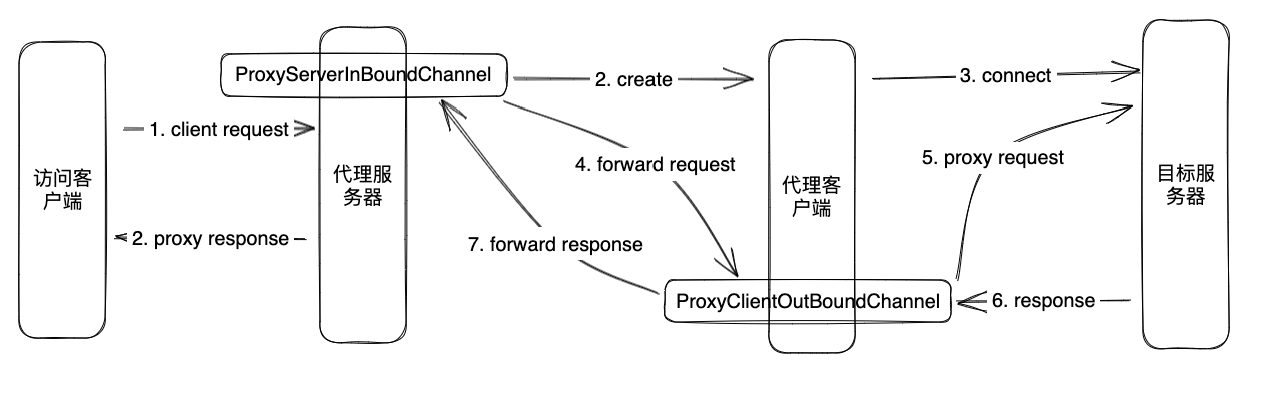
在 GitHub 看到一个使用 Netty 实现内网穿透的工具,使用 Java 实现,学习一下。
比如,将 127.0.0.1:3307 代理到 127.0.0.1:3306。如何实现呢?
需要三个角色相互配合起作用:客户端服务、代理服务、目标服务。以 MySQL 连接为例:客户端服务连接到代理服务:3307,代理服务会将客户端的请求转发到目标服务:3306。因为代理服务依赖于目标服务,所以它们的启动顺序是:先启动目标服务,再启动代理服务,然后使用客户端连接到代理服务。
利用 Netty 来启动服务是很容易的,难点在数据帧的设计和 ChannelHandler 处理数据的逻辑上。先创建目标服务
https://waylau.com/netty-4-user-guide
https://waylau.com/essential-netty-in-action
https://dongzl.github.io/netty-handbook